Creating an aggregated list
The following describes how you can create an element. To see which functions are available when creating an element, see the section on Functions.
Procedure
- Activate the App Designer in the Administration app
- In the app of your choice, open a data record in read- or edit mode.
- Tip
You can also insert this element into a dashboard.
- Click Customize in the toolbar of the App Designer.
- When you are at the location at which you wish to insert a new element, click the respective button to insert the new element, for example, Extend z-layout.
- Select Aggregated list.
- The element is inserted. If necessary, you can move the element to another position.

Functions
Data source
When creating the element, you can set which data records you wish to display in the Data source field.
Function | Description | |||||||||
|---|---|---|---|---|---|---|---|---|---|---|
All data records | If you select this value, all data records of the selected data record type are taken into account. | |||||||||
Linked data records | If you select this value, only the data records of the selected data record type which are linked with the currently opened data record are taken into account. The following data sources can be selected.
|
Data record type
Select the Data record type, for example, tasks.
Query parameters: Adjust filter
With the Adjust filter function, you can define comprehensive filter settings.
Certain filter conditions cannot be applied if a mobile app is used in offline mode. This includes the link conditions, complex queries in expert mode, and all date jokers excluding: current week, current week+?, current week-?, yesterday, yesterday+?, yesterday-?, today, today+?, today-?, tomorrow, tomorrow +? and tomorrow-?.
The adjustments are available in two modes, the Standard mode and the Expert mode.
Function | Description |
|---|---|
Default mode | If you click the Adjust filter button, you open the default mode. In the default mode, you can define the same settings as in a view filter. |
Expert mode | You select the expert mode via the button. In the expert mode, you can define your filter conditions via a code.
Example You would like to filter all tasks which have a value entered in the Priority field and which have not yet been completed. To do so, enter the following code: CopyPRIORITY != '' and WORKINGPERCENT < 100 For the Linked data records data source, you can add target to the field name: Copytarget.PRIORITY != '' and target.WORKINGPERCENT < 100 |

Query parameters: Sorting
In the Sorting area, you can set the fields you wish to use to sort the displayed data records by.
Function | Description |
|---|---|
| Select the field by which you want to sort the list. |
| Select whether you want to sort by ascending or descending order. |
| If you wish to sort by other fields, then click Add sort criterion. For each sort field which has been inserted, you can decide whether the sorting should be ascending or descending. |


Aggregation function
In the Aggregation function field, you can define the basis on which the data in a chart is displayed.
The following aggregation functions are available: Number of data records, Maximum, Minimum, Sum, and Average.
Grouping
You can set a user-defined grouping for charts and aggregated lists if required. With the user-defined grouping, you can create more groups and define your own filter settings for all groups.
Group by
In the Group by field, you define which characteristics you would like to display. The list contains all fields of the selected data record type.
The Group by list is only displayed if you have selected the Default value as Grouping.
Add group
If you have selected user-defined grouping, then you can create multiple groups and define filter settings for these groups.
Procedure
- Click Add group.
- Enter the name of the new group in the desired languages.
The name of the group is displayed in SmartWe.
- Click Apply.
- The group is saved. Repeat this process until you have created all the groups you wish to create.
You can edit the groups after you have created them.
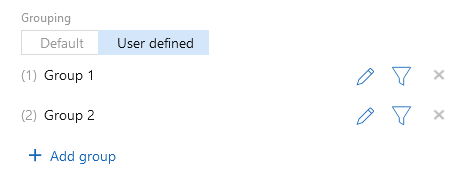
Function | Description | |
|---|---|---|
Change order | The number in front of the group name indicates the order. You can change the order using drag and drop. | |
Edit color | Click this button to select a color for this group. | |
Edit translation | Click this button to change the name of the group in all desired languages. | |
Adjust filter | Click this button to define filter settings. You can find more information on filters on the following page: Customizing filters. | |
Delete | Click this button to delete the group from the list. This button is only available if at least 2 groups have been created. The last group cannot be deleted. |


Granularity
If you selected a date field in the Group by field, then you can define the granularity of the grouping. You can choose between the following options:
- Year
- Quarter
- Month
- Week
- Day
Time zone
Define for which time zone you wish to perform the calculations.
Aggregation: Sorting
In the Sorting field, you can sort the aggregation using two criteria: Grouping value (X-axis) and aggregated value (Y-axis).
You can set which of these criteria should be used for sorting first. You can also set for each criterion whether the sorting should be in ascending or descending order.
Function | Description |
|---|---|
| Select the field by which you want to sort the list. |
| Select whether you want to sort by ascending or descending order. |
| If you wish to sort by other fields, then click Add sort criterion. For each sort field which has been inserted, you can decide whether the sorting should be ascending or descending. |


Maximum number
In the Maximum number field, you can set the maximum number of values to be displayed in the aggregation. This allows you to display a top 5, for example.
Select the desired value from the list or enter an individual value.
Automatic update after (in minutes)
The contents of specific elements can regularly and automatically be calculated anew. You can set the interval in the Automatic update after (in minutes) field.
If you select Never, then the element will only be updated when loading the page.
Description
The following options are available to change a static header or title.
Function | Description |
|---|---|
With this button, you remove the current header. | |
| With this button, you select a header. In the list, you can find all texts available for the open app. |
With this button, you change the text of the header. Note This text may appear in different locations. If you edit the text, it will be changed in all locations. System texts cannot be edited. | |
Using this button, you can enter a new text.
|


